OP: Irene X

•6Nov2012 • 1 Comment

I had the opportunity to attend the national level event, OP: Irene X, as a guest of sponsor Evike.com (who is also a sponsor of Airsoft Commando and NYC Airsoft). This was the first time I participated any event this large. The majority of my experience started with small games with friends in Northern Minnesota, transitioned to small regional games hosted by Filforce in NY/NJ, and in recent years, large events hosted by NYC Airsoft for the whole East Coast (Evike.com gave away 6 boxes of guns and gear at the last OP: Bad Blood…which teams I commanded has won every single year since 2008 ;p ).

Prior to airsoft I served four years active duty USMC finishing out my contract with 3/1 STA. I have only participated in one large scale (300+ people) training event, though that experience is irrelevant considering large events generally only evaluate command and control rather than small unit ability (despite what they say). However, my extensive airsoft experience, coupled with years of operational experience and small-unit training, I believe provide me with a strong foundation with which to evaluate this event.

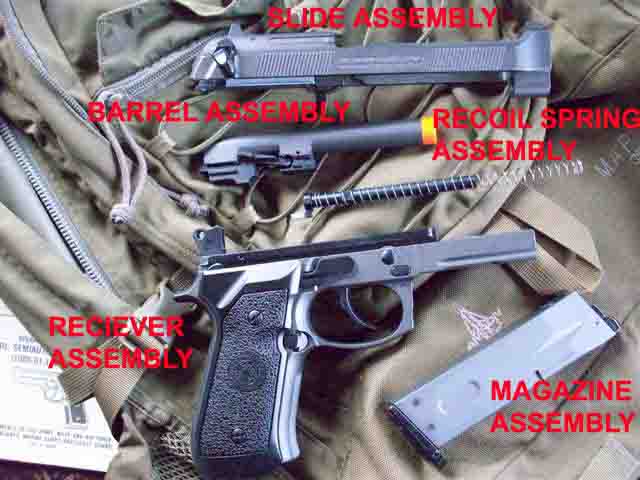
Evike.com also sent along Primer from team Violence of Action (VOA) and we made a roleplaying staff team alongside team members of EAGLE and Blacksheep. For the initial portion of the scenario we were the Muscatuck National Army (MNA) wearing all black and later roleplayed local warlord militia wearing snowflage (or “urban” for the uneducated). The vast majority of my airsoft arsenal has come straight from Evike as sponsor gear. My gear is genuine combat quality kit I know is good because I have bet on it in my previous life, no Condor or Flyye for me (though I’m sure it’s a suitable and affordable alternative for young airsofters). I have an M4/M203 Matrix Customs (impeccably organized internals) I intended to use, but even as a stock gun, it was shooting 388 feet per second (FPS) using .25g BBs which is much too hot for this event and many others. I was fortunate enough to be loaned the gun Polarstar (P*) had set aside for the raffle. After brushing aside the guilt of devirginizing someone’s new gun that was going to be signed by MSG Howard “Mad Max” Mullen, I got rigged up. Those P* guys were right, loaning out guns is a great marketing idea because whoever plays a game with one is 99% likely to buy one. It changes the whole feel of airsofting. It made me feel so…ninja.

+Sideline+ On P*

Primer had an Echo1 SCAR to loan me, but the Polarstar (P*) booth set me up with the raffle gun. It was sick. So sick. It’s hard to go back to an AEG after that. The tank and hose are hardly noticeable and it’s a no-brainer when you’re weighing the Pros and Cons. The consistency and trigger response are choice. That particular gun wasn’t impressively accurate and the rate of fire was set to an ideal rate. I found myself shooting semi-auto even outdoors anyway. Primer had his set to a 6 shot burst when switched to full-auto. I don’t think it would be too difficult to accurize it with a little polish, nice inner barrel, and heavy (.3g or higher) BBs. I used the P* all day Saturday, and then Primer’s SCAR Sunday. I actually really liked the SCAR. It was shooting super slow, but it shot like a laser. To be honest, if I had known it would be so accurate, I might have used the SCAR instead of the Polarstar. The Scout/Sniper in me puts accuracy first, but really, I couldn’t pass up the chance to run a P* and really give it a solid test run. Primer didn’t seem to have a problem getting his P* as accurate as his SCAR, but the one I was using was just a P* Commercial-Off-The-Shelf rig. I want a P*.

The P* guys told me that the V3 engine should go public by Christmas 2012. It’s technically ready, but they are trying to test many V3 variants to get it as widely compatible as they can. They also had a M240B, M249, and RPK on display. Rumor was they were using them in the game too, but I never used them. I only fired the M4 and a M110 models. All were very nice. I was told they also were working on a non-electric version that would run only on air. Ben said, “…come up out of the water firing.” Seems ubersex to me. They are working on training weapons specific for MIL/LE and even are in partnership with another guy who is trying to replace MILES system for the military and has a hit sensitive vest that can work in conjunction with the weapon to deactivate it when you are officially hit.

If you’re the kind of airsofter who needs a M40A3 P*-type rifle with the rig fully integrated into the McMillian stock and can spend several thousand dollars to buy a unique proof-of-concept airsoft gun. Scuttlebutt says you should ask around for Ben Noji.

+End Sideline+

I certainly enjoyed the event. Being placed on the Staff Roleplayer team didn’t afford me much of a look at the missions and objectives, but I did get a unique look at how both teams got utilized. A couple individuals I talked with spent the entire game dumping thousands of rounds (behooves you to get a SAW slot), and others who ended up on guard duty. Since there were multiple scenarios (Saturday had 3: breakfast to lunch, lunch to dinner, “night”. Sunday breakfast to late lunch) I would assume the commanders rotated the squads through responsibilities so everyone got their money’s worth, but I met one man who was frustrated at his lack of engagements.

Which seems odd to me. There were nearly 600 players including the staff, and there was less than 100 staff. It should be a target rich environment. It seems that even an expensive, well-organized, well-executed scenarios game still is plagued by “airsofting”. All scenarios and games will be what you make of them. Just as people sit behind cover at the very edge of their maximum range swapping plastic with each at small local games, they do it that much more at big games. Again, I’m not sure the respawn policy for regular players, but everyone seems terrified of taking a hit, which holds them back from really getting into the game.

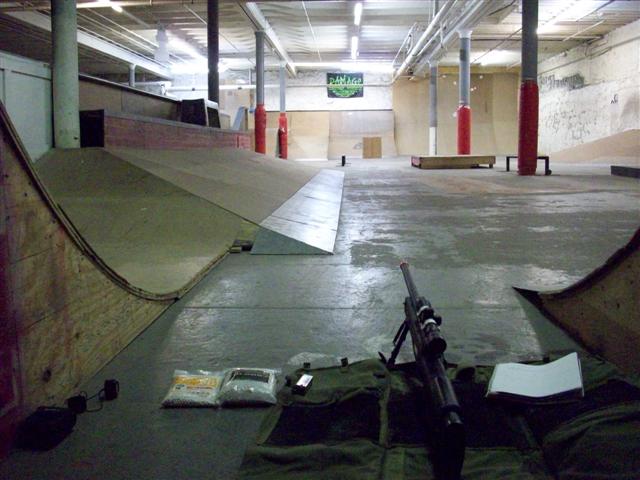
The Area of Operations (AO = skirmish field) was pretty dynamic. There were furnished buildings, “bombed out” structures, and little shacks. Debris and alleyways were everywhere. Smoke machines constantly pumped at random points and gas fires set in engine blocks and vehicles would randomly “explode”. It actually made me a little jumpy from time to time. Some buildings were quite difficult to assault, with others being so exposed to the outside you had to be very conscious of your movement inside. A few of the buildings even had ladder access to the roof which was about three stories up.

Being role players was a little frustrating at first, because how we were attempting to facilitate the game wasn’t entirely clear. Both teams looked at us as a rival team instead of storyline characters. It made it difficult to accomplish a new task, such as making liaison with the commander to discuss NATO personnel in hiding, when they would shoot us on sight because in the last scenario our task was create green-on-blue incidents. But really, that’s understandable. Not everyone is always on the same page about what is happening. Like players calling our hits for us or telling us we are not doing something right even though we are there to help their game along, not be airsoft ninjas. Like, “Really? You think I’m not calling my hits because it matters whether I get out or not?”

These are issues present at every level of training and gameplay, whether airsoft or the big leagues. It’s not until the bullets are calling hits for you that any of this goes away…and that sucks. It’s part of the game, so adapt, overcome, and enjoy the sport with its limitations, not despite them.

Saturday

Our squad-sized unit began play portraying a rabble of Muscatuck National Army. Our first task was to being trained by a Delta team cadre before accompanying us on a raid of a local insurgent village. Their points depended on the clearing of the village and our performance depended on how well we figured they “trained” us. A man with the nametape “Smith” conducted our basic training. He introduced himself as a Special Forces veteran and then gave 15-20 minutes of hands on instruction that convinced me. Judge a man by what he shows you, not what he tells you. It was a hopeless task however. We fought to take that village with every fiber, but it simply wasn’t happening.

As we, accompanied by a squad of Delta, patrolled to the village utilizing defilade to flank it, basic patrol techniques were either unknown or disregarded. A few members sky lined themselves over the ridge and were seen by the insurgent element played by Charlie. A Nerf rocket sailed in moments later, eliminating roughly one-quarter of our personnel and dividing the ranks. Only one MNA was lost, and Delta, who hadn’t received our special ODA training (which I thoroughly enjoyed. A highlight of my experience.), fully realized the painful lesson in the importance of dispersion. I pushed on in our planned route, which ended up being only a fire team sized element, which quickly dwindled to only Primer and I. We used Fire-and-Movement to get nearly into the village before getting toasted. Primer was hit on his dash from the car to the building and I when OpFor popped a corner cleanly. I may have hit one or two Charlie utilizing the Drake Shoot, but Primer got most of them I believe. Another MNA we discovered as the walking dead had made it to the roof of one building but couldn’t move from it without any buddies, who all were out by then.

Apologies to Delta for not getting them max points. We did have to assault the high ground (pairs of enemy on roofs and in doorways), and do this across open ground using AEGs with a max of 150ft of range…and they all took their hits first.

From their we established our MNA HQ from which to respond to calls from the local Police role players (MPD) if either team was violating Civilian role players in whatever ways. Within an hour, we were enemies of both factions. There were many firefights we participated in on both sides of the conflict to facilitate the story line. There were two of note during this period.

Firefights

The first wasn’t much of a firefight. A player had been left on a roof to defend it. I’m having trouble remember which side now, but I think it was Delta. We received a request to investigate this given our general non-combatant role. Sole access to the roof was up a 15 foot ladder in a 2nd floor closet and through an access hatch. An MNA began climbing and within 2 feet of the top, began back down saying he was dead. The next did the same thing with the same results (surprise, right?). I knew what would happen, but we needed a clear ROE violation to pass over the radio, so I was next. I announced, “MNA, neutral,” repeatedly all the way up the ladder and was met with a safety kill just the same. I detest safety kill rules, but they ARE the rules. Continuing my climb to assess the situation, I found one lone player, impressively successful in carrying out his orders to kill anyone coming onto the roof. No amount of grenades or entry techniques could have root him out (in airsoft anyway). We reported it before leaving to go about other tasks. He didn’t violate any rules despite the other teams protests that he did. However, to facilitate the flow of the game, he was administratively disarmed and removed. I believe he was given to MPD to be escorted to a trial scene of some sort, but both teams cut everyone down on sight. None survived.

I took this experience with me as I led a 3-man team into another identical building held by Delta. We had been tasked with clearing that building of foreigners so it could be used by civilians or some such fantasy scenario. Who cares? Airsoft time! It is best to clear a building from top down, so we have to start at the roof somehow. Using this technique, you give the enemy a place to run, rather than fight, and your security element (which we didn’t have) can pick them off from cover in open ground. Primer and I had picked up another player randomly who wore GI-issue ACU. I only knew that he was going to run with us, but he didn’t seem like he knew airsoft. We three entered the building through the rear entrance. We stayed quiet and narrowly avoided the occupants all the way up to the roof access. At one point it was extremely Metal Gear with their backs to us. So exciting! I slung my rifle, drew my pistol and began to climb. I assumed the scenario would go much the same as the other roof. It didn’t.

Here the security man, this squads leader, was chilling against the side of the roof without a weapon in his hand. Barely clearing my eyes and muzzle out the hatch, I engaged him with about 10 rounds of 6mm from my KWA G19 (CO2 extended mag). He called his hit, realized no one else heard him, and called it louder as an alert to his squad. I peered around the roof, and saw about 10-12 guys on the other side engaging targets below. He smiled and shrugged and I made my exit. I think I smiled back but I was getting tunnel vision. I holstered my pistol, pulled out my P* M4 and stepped onto the roof. I got low and took up a defensible position. Still no one noticed. I called the others up, telling them to be quiet and quick. Our mysterious friend reached the top, but Primer never came. I asked about him, but ACU was clueless. So we moved on. I got him in a firing position on the right side of the hatch and told him to wait for me to start shooting. Then he would shoot the right most man, then work toward his left. I got into my position and the turkey shoot began. I worked from left to right until all targets were down. They were confused and mad. So mad. Two targets were even in line with each other and the man behind coordinated his dead buddy as cover. Devious, but I read it and he called his hit anyway. Pretty sure I started shooting his “cover” even before the move. Then a BB skipped right off my forehead. I called my hit to figure out how one got through. There was only three enemy on the roof I couldn’t engage myself due to the layout and ACU-man should have had no problem. I slipped a little into Marine-mode when I was trying to figure out how he screwed it up. Apparently he stopped shooting after the first two because I only told him those two…the last guy killed us both.

Before descending, I had the decency to gloat a little to all the dead. One Delta commander popped his head through the hatch and seemed a little awed at what happened. I asked if he killed my security man at the bottom of the ladder, but he didn’t. He had no idea what was going on until he popped his head up. I later found out from Primer that he was holding security when the whole squad walked in and rather than get shot up he just said, “Hey, what’s up?” gave a smile, and left! We had a pretty good laugh. I wish he had come up and the other guy had stayed useless on security. Found out later that guy was a National Guard facility guy of some kind and they just gave him an airsoft rifle to give him a taste. I tried to take him under my wing, but he ended up disappearing and I never saw him again.

Hostage Rescue

That evening all the roleplayers were taken to two separate buildings. Each guarded a down pilot for the teams to rescue. We took up strong points and made them earn it. Four of us on the bottom floor must have dropped twenty OpFor (with continual respawn) before they were able to move upstairs. Both teams were able to secure their objective. It was an incredible firefight. It was inevitable they would be able to get us all, but the teams were timed against each other, and they couldn’t accidentally shoot the hostage. I am surprised neither did.

Of note in this scenario was the flawed concept of “stacking”. Stay close to your buddy, but stacks are an extremely advanced method of recapture that is much more involved than simple room entry techniques. People had trouble clearing the fatal funnel and caused gameplay trouble when they blocked the fatal funnel when they were hit which made their buddies sitting ducks in their beloved stack. CQB against entrenched enemy who want to fight is a suicide trip. In the real world, you need to cheat, blow holes in walls or floors, frag every single room three times, and jump to the next building to fight from the top down. In airsoft, the playing field is mostly level. Just like when I was training in the USMC with Simunition, against a fighting enemy, if you take double the amount of shooters against the enemy, 80% aren’t going to make it. Get Thunder Bs and Tornados and apply them liberally indoors. Then get out of the way.

Sunday

Sunday found us tasked with guarding a “UN Food Depot” that both teams had to secure bags and crates from for points. As both teams approached within firing range, we played out a scene where the civilians rioted and ran off with the items. We set chase firing wildly all over (but never hitting the civilians) to recover the food and return it to the pile. Our goal was to get one of the teams to violate ROE and kill a civilian in order to secure some of the food. It wasn’t too long before a Charlie with sergeant stripes ran up to the three of us and popped us all with a pistol and ran off with the jerry can prop! After I stopped laughing, we sent the info up the chain, and the gloves were ordered off.

I don’t know what the objectives were for either team, but we were tasked with creating chaos all over. We tried to give everyone more trigger time than they could handle. We scouted around for groups just sitting in buildings or behind bunkers and ambushed them. It was great fun, if kind of unfair from their perspective. We popped in an out of play with red rags on just to find people and get them moving and into the action. It was very entertaining.

Thanks to Evike.com for sending me as their brand rep. I tried to give some patches and swag to the guys from Parafrog, but they declined. Sorry.

Unsupported Shooting Positions

•28Jul2008 • 9 Comments

This is a list, with illustrations, of different shooting positions for typical use with a precision type weapon. However, they can obviously be adapted to any weapon type you like.

These are all unsupported and as such, are the least stable of positions that you could ever choose to use. Utilizing some sort of sling technique would be a good idea with these. It makes it more stable and any edge you can get is a good idea.

The fundamental similarity between every single one of these positions is quality bone support. That’s why some of them look so silly, especially the low sitting. No one laughs at how silly you look when they’re calling themselves out…

The rule of thumb for selecting a position is to be only as high as you have to be to get the shot. The lower you are, the more stable you are, the more accurate your shot will be.

From least stable to more stable (highest to lowest):

Standing

The most unstable of ANY shooting position.

The most unstable of ANY shooting position.

This should only be attempted on stationary targets. There’s already enough going on with this position that could go wrong without trying to engage a mover. The most important aspect of this position you should remember is that you are probably not going to get a hit. This technique should not be considered precise by any means, but desperate times call for desperate measures. Here’s the best methods for a poor technique.

Position your support arm elbow against your body and lean slightly back. Position the hand to support the rifle using as little muscular tension as possible. Most of the weight will probably be forward of your support hand. Do not use your firing hand to pull down on the rear portion to compensate. Your firing hand should be pulling the rifle into your shoulder. This should compensate for most of the forward weight, but use your cheek weld to further solidify the position.

This position can only be reliably maintained for the span of one shot. Due to the natural instability of the standing position, you need to concentrate most of your efforts of getting the best possible natural point of aim and applying the breathing, sighting, and trigger manipulation fundamentals as religiously as ever.

A technique that I used whenever attempting to fire accurately from the standing is a variation of the combination of tracking and ambush methods of moving target engagement. Get your the best natural point of aim you can in regards to horizontal position (that is, worry about being aligned on the targets vertical axis, without being left or right of it). Establish your position and take in a deep breath that puts your sights directly above the target. Begin taking up your trigger and slowly exhale. Squeeze and exhale evenly until your sights drop to the target, that’s exactly when the trigger should break. Don’t pause to fire or hold your breath. Using this technique I was able to attain three 5’s and two 4’s in the standing portion of the rifle qualification of boot camp (100 yards with open sights).

Kneeling

Relatively stable while quick to assume.

Relatively stable while quick to assume.

This is a good quick position to assume. This position is very easy to do incorrectly and it’s not stuff that people will naturally think about. Therefore, take the following pointers and get the edge.

Your support arm elbow does not rest on the top of your support leg knee. This puts your body position that provides stability in vertical travel, but you aren’t stable horizontally. Position your elbow forward of the knee so that the back of your arm is on the front of your knee. Think of yourself as trying to rest your armpit on your knee and your getting close.

Your support hand can afford to rest a little bit farther out on the stock for better balance. Just don’t toss it too far out there because then you’re using the muscles in your forearm to hold the rifle up and they’ll fatigue quickly this way and be less stable as a result.

Your firing side leg is the keystone of this position. Many people will naturally put their toe up and with your support arm so far forward, their butt won’t be in contact with anything. However, if you don’t lay your leg from the knee to the toe flat on the ground, and sit your butt on it, you are holding your entire body up with muscle support and you will fatigue quickly and be less stable as a result. Seeing the pattern?

Push your firing leg knee out as far as you can so it’s perpendicular to the rifles long axis (like a “T”) and sit your self down on the heel of your foot. You can lay your foot sideways if you like, but this hurts my ankle, so I go laces flat and my toes pointing.

Adjust your support side foot forward or backward to adjust elevation and vertical natural point of aim. Pivot on that same foot while sliding the firing leg to adjust your natural point of aim horizontally.

High Sitting

Archaic but has it's place in the toolbox.

Archaic but has it's place in the toolbox.

Personally, I think this position is much to unstable when used in conjunction with modern sniper rifles to be effective, but it’s still taught because the Marine Sniper book has a picture of it on the cover. With old school sniper rifles, it may have been more feasible, but these days the rifles have huge scopes, bull barrels, ginormous stocks, bipods, etc. It’s not uncommon for a modern sniper rifle to be pushing twenty pounds whereas the Vietnam era rifles in use when this position was popularized were exceptionally heavy if they were eleven pounds. I’d say Mr. White Feather’s rifle was probably seven pounds.

Regardless, it gets you a little higher than the low sitting, and it looks considerably less stupid and awkward.

The high sitting is easiest to attain if you start from the standing. Cross your feet and put your heels as close together as possible. Hold your rifle with a firing grip and cradle the forearm in your support elbow. Then attempt to sit straight down on your heels without leaning forward or back. This gets your feet as tucked in as possible.

As your knees approach your chest, your support arm grabs your firing leg knee while wrapping around the support leg knee. The firing arm wraps around the firing side leg. Draw it all in tight like your stuck inside an shell like an egg or something.

Your body should be at an angle to the target. Basically, your support elbow and firing toe with point toward the target, give or take. To adjust your natural point of aim, push and pull with your toes to spin your body.

This position is difficult to maintain with a front heavy rifle. Unfortunately with many of the modern rifles, they are too heavy to just rest, so you must hold them down with your firing hand, support hand, and cheek weld. This makes the position rather unstable, but desperate times call for desperate measures.

Low Sitting

Ugly but stable.

Ugly but stable.

This position starts in much the same way as the High Sitting, but your knees spread as you lower and you do sit on your heels.

Position both elbows forward of the knees like you did with the Kneeling position that’s pretty much it. Your weight will be slightly forward of your comfortable center of gravity, but it’s pretty stable once you get it locked in. It’s good for being a little higher than prone will get you, and not putting your butt on the wet ground or something.

Consider it an alternative to the Rice Patty Prone position, which is covered in the Unconventional Shooting Positions article.

Prone

Your best option, but it shouldn't be hard to find support too.

Your best option, but it shouldn't be hard to find support too.

To be honest, if your able to use this position, there’s no reason not to use something as support. A ruck, bipods, etc. but if you find the need to use this position, here’s how.

Do not lay down at an angle to the target like people usually do. For airsoft, it’s not really that big of a deal I guess, but if you’re firing anything that offers up some sort of recoil, having the centerline of your body behind the rifle does wonders to manage recoil and get quicker follow up shots.

Everything from your navel (belly button, not floating ships, they’re NAVAL) down needs to be flat against the ground. This includes your feet. If you make it to sniper school at some point in your life, and you have your laces flat to the ground and heel in the air, your going to find a two hundred pound instructor standing on them. Being flat provides stability and not having them sticking up is one less thing to get you spotted. They remain hidden behind your body.

Extend your elbows as far forward as possible. Just like you put the back of your elbows on the front of your knees in the other positions, you’re trying to put the back of your elbows on the ground. This doesn’t make sense, and isn’t really possible, but trying helps get you in the proper position.

Aside from this, keep your support hand as much above it’s elbow as possible so the rifle rests on bone support. The firing elbow is slightly pushed out to the side for lateral support of your body, the rifle should only rest on your support hand and shoulder. The firing hand only fires and throws the bolt.

TSD M190 Special Force

•24Jul2008 • Leave a Comment

Alright, I’ve had this pistol for quite a while and I apologize for dropping the ball, but here’s half the review. The opinion half. A properly documented performance half will have to come from someone else. I won’t be able to do it anytime soon, but discussed thoughts in a paragraph at the end.

Evike.com was gracious enough to send this piece to me the offer to keep it or give it away. While it’s quite the pistol, I decided to roll first-fruits right back into the project. As such, it’s going up for auction to a reader and the proceeds will go to making Airsoft Commando better.

My honest effort at artful presentation.

My honest effort at artful presentation.

Overview

Like many airsoft replicas out there, who manufactures this gun and what it’s called is a little confusing. Personally, I prefer to refer to them by what “real steel” firearm they are attempting to replicate. Therefore, this TSDtactical/HFC M190 Special Force (model number SD92 according to the box, HG-190 according to the manual, or M190 according to the trademarks on the slide) I’ll be referring to as the M9. M9 is the military nomenclature (name or title of object) for the 9mm caliber Beretta. The civilian nomenclature is Beretta 92F.

As far as replica accuracy, this one does a fairly good job. It’s almost identical to it’s firearm counter-part, even to the point of field stripping the same. If the Commandant of the Marine Corps were to call and ask for my opinion on an airsoft model to go with, I would choose this one for various reasons.

  • Similarity: Any issued M9 can be swapped for this. It functions the same in every way so training can be conducted to build muscle memory just as if training with live fire. That includes the safeties, slide, dissassembly, and distinct double-action first round then single action follow on shots.
  • Zero liability: With the “War on Terrorism” in full-swing, there is enough ballistic eye wear in the supply chain to utilize this training tool immediately. Most troops already have said eye wear. And it’s the only safety consideration one needs to observe to avoid injure due to this piece of equipment.
  • Cost: The government notoriously issues equipment that meets minimum standards contracted by the lowest bidder. This pistol is it. Not a piece of crap, it will perform as needed, but the price reflects it craftsmanship. There is better out there, but at $70 the cost-benefit analysis give this one the “green-light”.
  • Slide lock: A feature I LOVE seeing on airsoft weapons. It is usually found on pistols, but not AEG’s. This slide locks open when the magazine runs dry. Keeps things realistic.

There are some differences, but nothing too major. The frame has a tactical rail incorporated for the mounting of various lasers or lights. While the pistol should slide right into most holsters designed for the M9, you should be wary about some injection molded or kydex holsters. This won’t work in traditional Safariland or Blackhawk Serpa holsters (unless your holster is designed with the tactical rail in mind…). All cloth holsters should be fine. If in doubt, call your holster manufacturer (if it’s a reputable manufacturer of tactical equipment) and ask if your holster (model number/type) will accommodate a Beretta M9 with an integrated tactical rail.

Another difference is the safety. The safety functions exactly the same, albeit a bit “loosely”. The safety lever must be off safe in order to fire (that’s forward/up). However, it doesn’t need to be fully disengaged in order to fire. This isn’t a very big deal though. On an M9, when the safety is nudged in the “off” direction, it usually snaps completely off due to its design. One unfortunate difference is that the safety doesn’t disengage the hammer when it’s put on safe. More on this when I discuss it’s single-action/double-action characteristic.

The top of the magazine is plastic. One part of the feed lip cracked somehow. It may have come like this, but most likely I dropped the magazine. It doesn’t hinder firing or use at all, but sometimes it binds a bit and the magazine won’t drop free when it’s released. After putting some super glue on it, there’s no problems at all. Just be tender with the mags. The rest is all metal and fairly robust.

Oh, and there’s no lanyard loop on the airsoft model…

Specifications

Field stripped and labeled by its five major assemblies.

Field stripped and labeled by its five major assemblies.

The information supplied for this gun offers these stats:

Caliber: 6mm
Capacity: 25+1 (I only managed 24+1. Use 15+1 for realistic training.)
Propellant: Propane/Green Gas
Power: 300fps
Energy: 1.0 Joule
Weight: 1040g
Length: 216mm (appx 5 inches)

Diss-n-Ass

This pistol breaks down into these five major groups: receiver assembly, slide assembly, barrel assembly, recoil spring assembly, and magazine assembly. It can be field stripped the same as an M9 with only one slight exception. The airsoft recoil spring assembly has a peg protruding from the guide rod which inserts into the barrel assembly to hold it in place.

To field strip this gun, (take it apart into it’s five major groups) you need to ensure it is clear. Lock the slide to the rear by pulling it back (as if to cock it) and push up on the slide lock lever. It’s located on the left side just below the slide and above the trigger. Now the breach will remain open. Push the magazine release button located on the grip and set the magazine aside. Inspect the chamber to be sure that there is no BB in the barrel and that the pistol will not fire.

To remove the slide press the oval button located at the top of the trigger guard on the right side of the frame. While pressing this button, rotate the lever on the left side of the frame down. Push the slide forward in the direction the BB travels when fired and set the receiver assembly aside.

View the slides belly and push the base of the recoil spring guide rod in the direction the BB travels when fired. After the peg clears it’s hole, rotate the rod and release tension on the spring. Remove the rod and spring by pulling away from the direction the BB travels when fired. Set the recoil spring assembly aside.

Viewing the slide in the same manner as above, pull up (towards your face) and forward (direction of the BB…yada yada) on the chamber side of the barrel assembly slightly to unlock it from the slide. Once it’s high enough to clear the guts of the slide assembly, pull the barrel assembly toward the rear of the slide and free.

Now the pistol is field stripped enough to thoroughly clean it and keep it in proper functioning order. Reassembly by reversing the directions. I wouldn’t advise taking it apart farther than this because you’ll need additional tools. Aside from repairs, I see no reason anyway.

Here is a video showing reassembly. Pardon the quality, I was holding the camera strap in my teeth while doing this in order to get a solid view of the process.

Function

This type of pistol is what’s known as a double-action/single-action (DA/SA in shorthand). Depending on who you ask this is either a great thing or a terrible thing. Without turning this into a whole lesson on different types of actions for autoloading pistols, I’ll explain the function of this particular model. It’s different from the real steel M9 because the safety doesn’t cause the hammer to fall safely fall forward when it’s engaged, which you see at the end of the video above.

Essentially, double action pistols cock the hammer and cause it to fall with each trigger pull while single action pistols will only release the hammer from it’s cocked position with each trigger pull. Single action pistols must have the hammer previously cocked in order to fire. This is usually accomplished when the slide is racked to chamber a round, but could also be done by thumbing the hammer back.

In the case of the DA/SA M9 Beretta, hammer is cocked when a round is chambered, but the hammer is decocked when the safety is “on”. When you remove the safety and attempt to fire, the first trigger pull will cock the hammer and then release it. When it fires and cycles the slide, the following trigger pulls will all be single-action and only release the hammer to fire the pistol. The subsequent shots will remain single-action until the safety is engaged.

The upside of this system is the apparent safety of carry with the hammer down and difficulty of the first rounds trigger pull. I say “apparent” because it was created due to the fear many people had of the 1911 and how it “looked dangerous” when carried with the hammer cocked. In fact, the safety of the system has nothing to do with mechanics of the pistol but rather the safety of the operator. Any pistol is equally safe (or unsafe) depending on the reliability of the person using it.

I must admit, the downside to this system very much outweighs the upsides. The trigger pull of the double-action round is approximately 8-10 pounds, and the travel distance is greater than one-inch. What this means is that the first shot is hard, and the rest are easy. Without considerable training on this pistol, and this pistol only, it is difficult to reliably engage with more than one round because you must reposition your finger (if not your whole hand) in between those shots.

However, nearly all of this is negated because the airsoft model doesn’t release the cocked hammer when the safety is engaged. Considering that, this pistol isn’t all that bad for use as a sidearm but without manually decocking the hammer, the training value is nil. Training the transition from initial shot to follow-on shot is probably one of the most vital aspects of employing the M9 Beretta. To manually decock the hammer, you must disengage the safety, aim in a safe direction, and fire the pistol while safely letting hammer down with your hand.

Other Considerations

Weight

This pistol is hefty, mimicking the weight of the real steel (loaded) accurately. All to often people review their airsoft weapons without remembering that real steel weapons weigh vastly different when loaded or unloaded. Most airsoft models are designed to weigh similar to their counter-part when loaded.

Lefties

The safety lever is ambidextrous and can be manipulated from either side of the pistol. The real steel M9 allowed the magazine release button to be switched to the other side for lefties as well. I wouldn’t be surprised if the airsoft model could be done this way too. If not, you can still hit the button with your finger. The only issue is that if it can’t be swapped, and you have a tight grip, you MAY accidentally cause the magazine to release prematurely.

Size

Personally, I do not like this pistols size. The M9 Beretta was always much to large for my hands and since the airsoft model is so close to the real steel, I don’t like the airsoft one much either. I was always one of the smallest people in any unit I was in, if not the very smallest. I am about 5 foot 5 inches with smaller than average hands for a person my size. The Beretta is certainly not a “one size fits all” firearm. In my experience only individuals measuring an average of six feet tall (or shorter if you have bigger hands) are able to master this weapon system to it’s full potential.

Trigger pull

The size of this pistol affects more than just grip. Since the pistol is most often fired in a double handed grip (and airsoft blow back and 9mm recoil is mostly weak) control isn’t the issue. The length of pull on the initial double action shot is my concern. My finger is fully extended and barely able to pull the trigger. As a result, my first shots with the pistol were generally less than accurate. The single-action shots with a Beretta are like butter though. Very nice. It’s very important to train that transition between first and second shots.

Safeties

This pistol has all the same safeties as the real steel version, with the exception of the firing pin block, because there is no firing pin. There is the lever safety as well as the half-cock notch. The half-cock notch is a passive safety system (nothing must be consciously done by an operator in order for it to function). It is a stop within the hammer mechanics which prevent it from falling completely forward and accidentally discharging in the event it is dropped, bumped, or any other such event. The half-cock notch is disengaged only when the trigger is pulled. For example, if you were to pull the trigger and manually let the hammer forward only a little, then release the trigger, if the hammer continues forward, it will stop half-way on the half-cock notch. You could also observe it by pulling an uncocked hammer back half-way and it would hold there, but still not be in single-action mode.

The lever safety is also an issue with small hands. It is located at the top of the slide and is designed to be flicked off and on with your firing hand thumb. However, if were to maintain a proper grip on my firing hand, I couldn’t reach the safety at all. I needed to break the grip of my firing hand (slowing my functional reaction time considerably) or use my support hand thumb (slowing my functional reaction time only slight less).

Working with Flaws

While I was in the service and issued the M9, I frequently was forced to fudge the safety rules a bit in order to take advantage of having a sidearm. Let it be known that I think safety rules are the greatest thing in the world, but as soon as those rules are a liability to my safety, they go out the window. Remember that the weapon safety rules are redundant for a reason. Even if you fail to follow one and still follow the others, you will avoid disaster. I was also a Marine highly trained with the purpose of risking my life for pretty much whatever I was told to.

The size problem with this weapon is well known among those that issue it. The way were trained to deal with it was to drag the pistol against our holster and body when drawing it. Because of the safeties location on the slide, it would flick itself off in this manner…sometimes. I legitimately tried training this way, but it only took getting lit up with simunition three or four times because my pistol didn’t fire when the safety didn’t disengage with that technique.

Then I switched flipping the safety with my support hand. This served me fine considering my level of training. I felt fairly confident that I could utilize this technique and remain faster on target than most tangos I would be engaging. The down side was my inability to engage immediately out of the holster. Sometimes a split second is the difference between life and death. If you think that the Israeli method of carrying and drawing is fast enough, this should be fine for you, but I don’t.

When it came time to engage live enemies, I did away with the safety entirely. I carried the pistol holstered with the safety off and the hammer back. This was very often frowned upon by superiors, but you have to know how to handle it. Don’t smart off about your finger being your safety. Pretend that you didn’t know and it was accident and do what they want…until they leave. If you muck it up, it’s on your head so it’s up to you if it’s worth the risk.

Ultimately

Accurate reporting requires detailed notes.

Accurate reporting requires detailed notes.

I did fire this pistol a few times. It was my first experience with a green gas/propane gun. At first, I was frequently cursing out the system because I couldn’t get the magazine full enough to get through a mag. Eventually, I got it figured out. Seemed to be a problem with the wetware (RTFM right?)…shrug. Once I got going it was pretty nice. I’m proud to say I’m no longer fearful of the propane system. Shot accurately enough for a pistol, although propane stinks a bit more than knew. I was throwing controlled pairs into a five inch clay pigeon at twenty-five yards reliably enough to make me comfortable, but not enough to make me impressed. And yes, it put holes in the clay pigeon, but didn’t shatter it.

You could also see the .3g BB in flight. I’m sure it shoots somewhere around the FPS listed in it’s documentation.

I didn’t get any documentation of it in action, so no pictures or fun videos of someone shooting me. Maybe next time, you sadists.

Whether you should get this pistol or not is going to depend upon your issues and motivations. I would recommend this pistol for these reasons only:

  • You are a big guy and think all the pistols you’ve tried feel like toys in your meaty paws.
  • You are trying to build a load-out that is exactly like this unit or that unit or something and you need a Beretta to round it off. If you think imitation is the highest form of flattery then this is the pistol you need.
  • If you are someone who is issued a Beretta and are looking for the training value of airsoft.
  • You want a gun, any gun, and can’t afford the best, but don’t want crap. Kinda like how Uncle Sam contracts the lowest bidder.
  • You used to be issued a Beretta and are confident with it as well as own accessories (holster, mag pouches, tac-lights, etc) for it. Getting this would save you lots of money if you avoid replacing said gear.

While I am impressed with this pistol as an airsoft replica, I do not recommend it for use just as I wouldn’t recommend the real steel Beretta for use. There is simply something better out there unless you fit into one of the categories above.

Firing Position Fundamentals

•27Apr2008 • 1 Comment

In order to make a good shot, an operator must have a thorough working knowledge of the fundamentals of marksmanship. They must perfectly execute the combination of sight alignment, sight picture, breath control, and trigger control so that the weapon is pointed accurately throughout the firing process.

However, there is so much more that goes into ensuring first round hits.

Elements of a Good Shooting Position

Bone Support

A bone will never, ever get tired. However, your muscles will get tired after only a few minutes of holding a position. When you assume your firing position, the trick is to place your parts so that your bones rest on other bones or stiff objects. This is very uncomfortable, but you get used to it after a while.

Muscular Relaxation

You will only be able to fully relax your muscles if you have bone support. Otherwise, you’ll find yourself manually forcing the rifle to point at the target as opposed to the sights naturally resting on it. Keeping your muscles relaxed will permit your mind and eyesight to function without distraction, allowing you to become a more efficient shooter.

Natural Point of Aim

This is the concept where you position your body so that the sights naturally line up with the target without being forced there. It may seem awkward, but the best way to get hits on target isn’t to point the rifle at the target, but rather to adjust your body so that you’re automatically pointing at the target without effort.

  • Aim at the target.
  • Close your eyes for ten seconds and breathe normally.
  • Open your eyes and see where your sights have drifted.
  • Reposition your body to compensate and try again.

You will be unable to assume a natural point of aim if you do not have bone support and muscle relaxation. If you do not have a natural point of aim, the strain of holding your weapon will cause your trigger manipulation to be less than perfect and your shooting performance will show it.

Factors Common To All Shooting Positions

Support Arm

Where your non-firing hand is placed greatly depends on which position you are assuming. For nearly all unsupported positions it will be on the forearm of the stock forward of the trigger, magazine, or receiver. In a low and supported position, such as the prone or Hawkins, the support hand may fist the rear sling swivel or simply be placed palm on the ground. Regardless, the support arm elbow needs to lay without strain. Tension on the the elbow translates into lost natural point of aim.

Pocket the Butt

Placing the butt firmly into your shoulder is about so much more than just softening recoil. It helps steady the rifle, prevents canting side-to-side, and enables other elements of your position to line up seamlessly, such as your spot weld.

Firing Grip

You need to hold the rifle firmly, but not with a “death grip”. Where your thumb should be placed greatly depends on the stock style. Regardless, your grip should allow your firing finger tip to naturally fall so the trigger lays on the pad between the tip and first joint. It also allows the trigger to me manipulated straight to the rear without causing tension elsewhere in the grip or disturbing the fundamentals of marksmanship.

Firing Arm

Properly placing this elbow is the crux of your firing position. Not only does it provide balance and symmetry within your position, but how you have your arm will help or hinder in creating a good pocket for the rifle butt to rest in.

Stock Weld

A stock weld is the ideal placement of your cheek on the stock in the same place from shot to shot. If you are doing this a lot, expect for your face to hurt quite a bit. Your stock weld should keep your eye at the proper distance behind your sight to give you the best quality picture you can get. At the same time, it shouldn’t have any neck strain whether it be up, down, forward, or backward. Natural and consistent cheek weld is the goal.

AGM type 96

•15Apr2008 • 7 Comments

Donated by Evike.comThis is the AGM Type 96 rifle I received from Evike.com for our first contest! At first, I was skeptical, because it list’s on their store for only about $80. That’s stock, without a scope and bipod. I went and bought a BSA 3-9x30mm scope to mount on top, and a Rock Mount bipod, which is a Harris imitation.

What also came in the package were:

  • instructions (mostly pictures, but has English!)
  • a un-jamming/cleaning rod (not just a stick, but has an eyelet at one end)
  • a magazine (about 25 rounds)
  • a speedloader
  • a “sling” (throw it away or modify it)
  • allen wrenches (only the two you need to put it together and adjust the cheekpiece)
  • BB’s of unknown origin
  • packet of silica to manage moisture, be sure not to eat it…

Bipod and Scope

When attaching the bipod, I noticed that the stud protrudes a bit far from the stock. You’ll need to add in some spacers to make it “rock” solid. When I bought the BSA scope, the rings were too small to mount to the rail, so I bought some cheap $10 ones. They didn’t clamp down enough to grip the mount without wiggle room and I haven’t yet discovered if it’s the rifles fault or the crappy rings I splurged on.

Another fabulous issue with my rings was they were low mount. I happen to like low mount rings. However, to get a full sight picture in the scope, I had to remove the cheekpiece. I couldn’t get low enough. The included rings on the package deal appear to be see through, or hi-rise, mounts. It sure looks stupid, but it’ll be better than the crap I had to put up with.

If you buy the rifle, get the full kit to avoid the same problems. All told, it cost me about $110 to make the rifle functional enough to test…well, $60 for the scope and rings…the bipod was something I needed anyway. The whole kit from Evike only runs about $130.

Accuracy and Hop-up

Sighting in for 100 feet

I sighted in at exactly one hundred feet (thirty yards) from the muzzle to the target. Shown in the picture is the rifle setup, Eagle Industries HSRC, a Bushnell Laser Rangefinder, test BB’s, and a notebook for gathering data. Down at the end of “lane” you see a large flat screen TV box donated by my roommate, John Kettelhut.

After testing the free BB’s included in the box, I scientifically determined that they completely suck. They must have been .12 grams (or lighter) because even with the hop-up on it’s lowest setting, the BB’s still were hitting the wall above the skate ramps. They were going fast though, I never once saw one in flight, naked eye or with the scope.

The hop-up adjustment is between the barrel and stock on the left of the rifle as you are sighting in. While this considerably easier to adjust on the fly than my Well Warrior I, I think this location makes it prone to getting easily bumped. That’s nothing a piece of tape over it wouldn’t fix.

I promptly loaded up the Perfect .3 grams that I have from my own personal stock. With the hop-up off, the BB’s struck the floor, with the hop-up all the way up, they rocketed to the ceiling. Right in the center, the BB’s flew straight and true, I didn’t even have to zero the scope at all. Once I determined the rifle was hitting point of aim, point of impact, I shot this five shot group.

Five shot group at one hundred feet.

That shiny white card is my drivers license provided for size reference. The five shot group could be called “fair” at ten inches at 100 feet. That’s enough for a head shot on an unmoving target. However, keep in mind that many official fields and games seem to put sniper engagement distances at MINIMUM one hundred feet. I wouldn’t trust this rifle much farther.

Replica Compatibility

The good news is that Evike says it’s fully upgradeable with Tokyo Marui G-spec parts. It seems true enough. My best estimate is that this rifle is a Tokyo Marui G-spec receiver and barrel, with a L96 style stock.

If you’re curious what this gun replicates, it would be most similar to a Remington 700 mounted into an Accuracy International Chassis System. That’s a little bit of a stretch, but it’s as close as it’s going to get, that is, until someone creates a real steel bolt handle like the G-spec. I wouldn’t count on it though, because it sucks. I grade it an A+ for style, but an F for sniper ergonomics.

Aside from the issues I have with the bolt handle, it’s a flippin’ sweet rifle for the price. I’m sure the high end rifles blow it out of the water (they had better!) but I’ve never used one. The quality of the materials and build smoke my Well Warrior I and I believe the accuracy is better, although I haven’t had the chance to group mine in the same manner.

Magazine and Function

I did experience one minor snafu. After having fired for a bit, I loaded in a full magazine and fired off a couple rounds without hitch. Somewhere in the early part of the magazine, I attempted to fire, but the trigger wouldn’t travel. I checked the safety, it was off. I thought maybe I hadn’t thrown the bolt completely, but it offered no resistance. At this point I thought, “Crap! I cycled two BB’s into the chamber…dang.” I tried to fire again, but nothing happened, again. After repeating the above, I was in disbelief and thought I had somehow sheared the cog or cylinder or whatever. By no means am I an airsoft-smith.

BB\'s lodged up side the barrel and blocked the cylinder.I observed this in the chamber after removing the magazine. Apparently, the magazine decided to squirt it’s entire payload into the loading area when I cycled the cylinder. It’s hard to tell from the photo, but it actually jammed up the whole gun. To remedy the situation, I held the bolt to the rear and shook all the BB’s out (about 15). When I next attempted to fire, probably three BB’s shot out…I never had a problem after that.

I’m sure many of you are familiar with how a Tokyo Marui magazine works. I’m not sure if the G-spec magazines are compatible, but from internet pictures, they seem to be different heights. There is a sliding piece that holds the BB’s in the magazine. When you insert it into the rifle, that slides aside automatically and the BB’s are properly loosed into the chamber. I most likely didn’t fully seat the magazine which allowed room for the BB’s to sneak around in there. That makes the malfunction no fault of the manufacturer, but rather, is shooter error.

I like this feature on the magazine because it makes it easy to unload it and relieve the pressure on the spring. Unfortunately, this also means that when you drop a loaded magazine from the rifle, expect two or three BB’s to drop free as well.

Pain (In)Tolerance

Finally, the moment, everyone worthlessly cares about, the rifles real feet per second. To save you time, I have no idea. I don’t own a chronometer and I’m not going to test it on Coke cans. However, I do recognize the one real test no one ever does and actually matters.

“How much does it hurt?”

And it’s closely followed cousin…

“Will someone feel it if I shoot them with it?”

The real answer is, “It’s only an airsoft BB, so no, it’s not going to end the world when you get hit with it.”

And

“I’d aim for bare skin and tight areas of clothing, such as the upper arms/legs, and back.”

I realize that’s pretty unsportsman-like for airsoft purposes, but you have to remember the world I am coming from. It hurts a lot less than a 7.62mm through your grape. If you’re utilizing airsoft for training purposes, it SHOULD hurt. That will train your mind to fight through the pain. Remember, just because you’re shot, doesn’t mean your dead.

When I take the youth group out airsofting we have a simple rule for FPS limits. You hand someone your gun, take ten paces away with your shirt pulled tight to your back, and they shoot you with it. If you want to shoot someone else with it, you’ll get shot with it. Sure, it’ll hurt, but you’ll be ok. I have yet to see airsoft penetrate the skin.

I’ll close with the video of my friend Amy (the Mother Teresa of the Encounter here in Duluth) taking the 100 foot test shot on my lower back. She aimed for the center, and struck three inches to the right.

Bolt Throwing

•12Apr2008 • Leave a Comment

The term “bolt throwing” refers to the operator managing the cycle of operations for a bolt action rifle.

The cycle of operations, usually, are: unlocking the bolt face from the chamber, cocking the firing mechanism, ejecting of brass (usually not for airsoft), chambering the new round, re-locking, firing.

I’ll keep this written portion short and supporting of the video because the bases are already covered in under two minutes.

Requirements: a bolt-action rifle and a strong stable firing position.

This is easier if you assume a position similar to mine in the video. Jason tried this same technique, as per my instructional, but had to adjust his body when it came time to throw the bolt. He got the rounds on target just fine, but racking it was awkward.

Then he re-positioned his support hand from the forearm to the buttstock.

The hand holds the stock in the shoulder, which is why you can use your firing arm without screwing up the whole position. The firing arms only responsibility is smooth trigger pull and bolt throwing. Technically, you shouldn’t even need to place your firing hand on the weapon.

Snipers, Designated Marksman, and Sharpshooters

•8Apr2008 • 3 Comments

The idea of a sniper, in the airsoft world, is a very broad concept. In the military and law enforcement community, there are many job titles that cover the spectrum of snipers. Some titles are interchangeable, while others are exclusive. Depending on which words the speaker chooses, various intricacies about the role can be “lost in translation”. This article aims to clear up the confusion by establishing three separate sniper jobs as needed within the airsoft community: Sniper, Designated Marksman, and Sharpshooter.

As I discuss these three roles, I will point out that, with the exception of sniper, they are frequently called by other titles, and sometimes one means the other. You can still choose to call them whatever you choose. These titles are merely tools in the toolbox. It’s the job descriptions that really need defining, and I had to choose something, so these are the titles I decided upon.

Sniper

This is your traditional military sniper. The Marines call them Scout Snipers, the Army simply Snipers or Bravo Four’s. The USMC definition of the Scout Sniper mission: A detachment of one or more sniper teams performing an assigned task of engaging selected targets, targets of opportunity, collecting and reporting information, or a combination of all contributing to the accomplishment of the supported units mission.

A sniper has two primary weapons, a rifle and a radio. An efficient operator will understand that relaying information to higher is oftentimes more important than eliminating personnel. Your initial reaction should not be to rack up your confirmed kills, but rather, to decide in favor of the big picture. If your mission is to gather information on troop movements and routes, you had better see the opposing team commander in your crosshairs before pulling the trigger. This aspect of the sniper role affects the enemy psychologically. They should fear your rifle, but also fear that you’re watching and not shooting.

For this type of mission, your rifle needs to be accurate with every shot. A bolt action rifle capable of striking a human target every single round at 100 feet should be a minimum. A two way radio, with at least an earpiece, is just as important. A ghillie, if done properly, would be a wise choice as well.

Sharpshooter

This would be your typical police department S.W.A.T. team sniper. This type of shooter definitely gets more Push-To-Talk time than trigger time. Base elements of the traditional military sniper role are similar, augmenting a raid type mission, for example, but for the most part are less refined. Consider the difference between the two mostly to be a matter of urban vs rural skillsets. Granted, both need to be fluent in either environment, however, the emphasis is divided.

In airsoft, a sharpshooter’s focus will be narrower. Their area of responsibility will be one building, or down one street, or something similar. That area is usually something that’s about to be raided or occupied by the CQB team. They will gather information and pass it to the leader of the team so they can make informed decisions for their plan. When the command to execute comes down, he may be assigned to eliminate as many enemies as possible, create a distraction away from the approaching team, or simply cover and protect as needed. They will also not link up with the team in the objective. They should remain remain in their position in case someone sneaks in behind them, or sneaks out. Everyone on your team should know that you will shoot ANYONE that comes out of the building without giving a signal (thrown chemlight, telling you on the radio, etc).

A load-out similar to the rest of the team would be advisable for this role. As far as weapons go, a bolt -action or scoped-semi auto would both suffice. Since you are choosing your battles in this role, you can sneak in and set up closer if your rifle can’t handle the distance of a bolt gun. A similar radio to the sniper would be good, but also include a remote PTT button. In this situation, you need to have your eye in the glass at all times ready to take a shot, so a radio button on your finger keeps you from disturbing your firing position as little as possible. I feel a ghillie suit in this environment is optional. The ability to create a hide would be far more valuable. Throw what you need to make both a green-side and a black-side (woodland or urban, brown-side is desert) hide into a ruck and remain flexible that way. A sharpshooter shouldn’t be moving locations a whole lot.

Designated Marksman

Now, a designated marksman is a unique and talented individual. They aren’t always necessary, but when you have a skilled one, you’ll appreciate it. These warriors are a combination of the two discussed above, and more. In the military, these are regular line grunts chosen for extra training due to their innate abilities. They are frequently referred to, at least in the Marines, as Squad Designated Marksman.

The DM is just another rifleman in the squad, for the most part. They carry the same weapons and kit as the rest and shouldn’t stand out from the others upon a brief inspection. As the squad moves about their environment, they may need someone to scout ahead, or to the side, and select a position that covers them and protects them. The DM’s skill lies in his level of responsibility and ability to operate independently. They can make decisions for themselves and give recommendations to support the mission. Rarely will they stay in one place for long, because they need to keep up with the squad and protect them as the mission dictates.

For this reason, I recommend an assault type rifle that is fitted with a low magnification scope or pocket binoculars. Some upgrades that make the rifle more accurate wouldn’t hurt either. A radio of any kind is good since stealth isn’t necessarily always a deciding factor for a DM’s mission (not like a sniper or sharpshooter anyway). A ghillie isn’t necessary, but solid movement technique is. Consider bringing along a ghillie veil or hood that is easily donned and doffed.

Toolbox Concept

•1Apr2008 • 2 Comments

An issue that I find is proliferating the airsoft forums is the misconception that there is “the right way” just as there is “the wrong way”. Everyone wants to be an expert. The ones who actually are experts are not considered such because what they are saying is correct, but because of how they conduct themselves and perform.

I don’t care what unit your friends brother is in. I don’t what your Dad’s job in the Army is. I don’t care who you are. You shouldn’t care that I secured the US Embassy in Monrovia during their 2003 civil war or that I was a USMC Scout/Sniper Assistant Team Leader in Iraq. There are many ways to get the job done and saying there is only this way, or that way, is entirely arrogant. Arrogance, as we all know, is the height of folly.

What I propose to you is a new way of thinking. Actually, it’s not all that new, but it’s a nearly a righteous epiphany to those who hear it for the first time…and here it is…the gun you choose is not your weapon.

What do I mean?

A crescent wrench can be used to hammer a nail into the wall, if you need it to. Obviously, it’s not the perfect tool for the job, but it will get the job done. This is fine for someone who doesn’t need or want to take pride in what they do. However, if you want to do the job right, with style and class, you will choose the perfect tool for the job, and use it to the best of your ability, as it was designed. Whenever you learn a technique, you “file it in your toolbox”. It’s stays there, ready to be used when you need it. The Marine Corps Martial Arts Program has a slogan, “One Mind, Any Weapon”. This should be true of every warrior, even in airsoft. All tactics, all gear and weapons are merely tools that help you get the job done.

Simply put, you are the weapon. You can decide, react, and adapt. What equipment you  bring to the fight are merely tools. Your mind is the real weapon. This is why the slogan for Airsoft Commando is “Educate / Dominate” because the more you understand, the better you will perform.

Welcome to a new plateau of wisdom.

Reloading

•26Mar2008 • Leave a Comment

There are two basic ways to reload, tactical and combat. A combat reload is frequently referred to as a speed reload.

This article covers the topic in a semi-broad manner. Because there are so many different weapon systems with different mechanics for their ammunition source, it is relatively generic. However, I try to be as specific and detailed as I can.

All of these are performed with the support hand. The firing hand never adjusts it’s position…ever…in any article or technique.

Tactical Reload

A tactical reload is when you reload without having run out of ammunition. If you have time, or are behind cover, and know your magazine is running low, you swap out. This is considered “tactical” because you are making a wise decision to keep your weapon in most ready condition possible.

  1. Place the fresh magazine in the web of your hand.
  2. With the same hand grasp the magazine still in the weapon between the index and middle finger.
  3. Press magazine release and remove spent magazine.
  4. Insert the fresh magazine until a distinct *click* is heard.
  5. Put the empty in your dump pouch. (or refill it with a speed loader and stow it).

Combat Reload

It’s called a combat reload because that’s what you’re in the heat of when you do it. When you are in a serious engagement with nowhere to go and your weapon ran dry, you will conduct a combat reload. This most often happens in urban environments where there simply is no rock, tree, or other micro terrain to hide behind.

  1. Rotate your weapon to ensure your weapon is indeed dry, and not jammed, if applicable.
  2. Draw the most easily accessible magazine while dropping the spent magazine free.
  3. Grasp the fresh magazine from the bottom with your index finger pointed along the face of the magazine (the face is what the enemy sees, the side with the bullets) and toward the open end of the magazine.
  4. As you bring the magazine toward the weapon, index the weapon (bring the magazine well closer to your body and visible).
  5. Insert the magazine firmly, but don’t slam the bottom of the magazine too roughly. If the weapon has a bolt or slide locked to the rear, the ammunition may unseat from the magazine and fill the chamber, causing a jam.
  6. Release the slide or bolt if needed and attempt to fire.

Don’t forget to pick up your magazine when you get the opportunity. In a compressed and urgent scenario, don’t worry about magazine retention immediately, just let it hit the ground. You are worried about getting rounds on target. If you survive, you can pick it up after the firefight.

Fundamentals of Marksmanship

•22Mar2008 • 1 Comment

This is not precision target shooting marksmanship, but rather, combat marksmanship. This concept is known by many various titles: Quick Kill, Close Quarters Battle/Combat (CQB/C) shooting, Military Operations in Urban Terrain (MOUT) firing, etc. Don’t get wrapped up in what it’s called. No one cares what you you know, only what you can do with what you know.

The base fundamentals of marksmanship have ALWAYS been Aiming, Breath Control, and Trigger Control. These apply to the long shots as well, but airsoft will never need a full article on long-range precision shooting. If you have some super tricked out sniper rifle, apply these same fundamentals but do it slower with more attention to perfection.

Truth be told, the only difference between combat shooting, and precision shooting, is wrapping your mind around not getting that perfect shot. In combat shooting, we compress the application of fundamentals to get the shot off quicker and end the fight faster. Especially in airsoft, it matters less where you hit the opponent, so long as you simply hit the target.

Aiming

This could be better thought of as the aiming process your mind and eyes go through, as opposed to the aiming process of your muscles discussed in another article. Two things to worry about: sight alignment, and sight picture.

Sight Alignment

As stated above, lining up the sights so that the front sight is perfectly centered, both horizontally and vertically (as seen through the rear sight), is nice, but unnecessary. At the typical ranges of urban conflict and the speed of the action, there simply isn’t time.

However, when you cause the trigger to break, the front sight should be where your eye is concentrating. It will also be between the rear sight posts or aperture (sighting hole/notch/etc), not perfectly balanced, but in there at least.

Sight Picture

Because your eye, like a camera, can only focus at one distance, the rear sight and the target will be blurry. No doubt this will be very awkward at first, but it is a tried and true fundamental. I had a very hard time doing this in a combat mindset and my hit ratio suffered because of it.

This technique, applied properly, is known as a “flash sight picture”. When you perceive the threat, and have pointed your toes at it, with both eyes open (see Combat Stance) you raise your weapon to engage. Your eyes are focused on the threat until your sights are in position. At that time, you shift your focus to the front sight. When it’s so sharp you could read a letter written there with a marker (write one!), the trigger breaks and you notch another kill on your gun belt.

Trigger Control

There are two types trigger control, interrupted and uninterrupted. For the same time constraints and perfection-less reasons we don’t worry as much about alignment, we completely do away with interrupted. We don’t squeeze the trigger any more, either. That’s for perfect shots on targets, not eliminating immediate threats. Leave that other junk to the snipers.

Improper trigger control is the majority of the reason people miss with bullets, but I haven’t conducted many experiments with airsoft in this regard. I can only assume the mistakes that professional warriors make, airsofters will double. The deciding factor is knowing whether airsoft BB’s are capable of holding a consistent enough pattern to determine whether it’s shooter error or equipment flaws.

Placement

Once your grip is established on the weapon, your hands should never move or adjust. The only things that should move are the trigger finger and safety thumb (depending on your weapon system). When you are manipulating the trigger, you’ll want the finger to touch it as naturally as possible. Much like having a natural point of aim, you need to establish and natural point of contact for your trigger finger. Having too much, or not enough, finger on the trigger will cause the shots to strike left or right of your point of aim. For my finger, the proper placement is directly in the center of the meat on the last section of my finger. Pretty much where the base of my finger is, except on the other side of my finger.

Press

Take up the slack in the trigger before you begin your press. The slack is that useless movement forward and back of the trigger that doesn’t work any internals. When taking up slack, you don’t worry about skillful manipulation. Just pull the trigger until you meet resistance. This is where the trigger press begins.

Often times, changing the way your mind relates to a process can help you better accomplish it. If you can make your self realize you aren’t pulling, but rather pressing the trigger, you’ll be well on your way. The entire finger shares the work in pressing the trigger rearward, but the majority of the effort and movement comes from the first joint (the one after the knuckle). It will take some practice, but it will be worth it. Spend some time dry firing or just working the trigger a bit. Focus your mind on perfect trigger manipulation. While you are doing it, ask yourself whether you are exerting any pressure left or right and correct if you are. You want that trigger to break crisp and clean straight to the rear only.

Follow-through

This will be a completely new concept for many airsofters who just picked up a gun to play some “cowboys and indians”. After the shot, it’s very important to have follow-through. What happens after the shot is just as important as what happens before the shot, in many cases, because you are now about to take another shot.

Do not take your finger off the trigger. Do not immediately shift your head, eyes, body, etc to see where your shot is going. If you get into the habit of immediately checking to see if they “called their hits”, you may subconsciously begin moving to do your post shot ritual before the BB actually leaves the barrel. Where does that leave you? Having to reset in order to take another shot.

Instead, once the trigger breaks, keep it held to the rear until you have recovered from the shot and would be capable of taking another well aimed shot. At this point, you release the trigger only as far as you must in order for it to reset. Now, you only need exert a fraction of the movement to send another shot downrange.

Breathing

How your breathing and firing coincide are an extremely vital part of making the perfect shot. As stated earlier, there’s not a lot of time to play about when the threat is immediate. A respiratory pause is easy to understand, you need only pay attention to how you naturally breathe in and out. Your lungs breathe in air. When they are full, your lungs begin to empty. However, after the lungs have emptied, a healthy and fit body doesn’t naturally start filling them up right away. A few seconds will tick by before you begin to breathe in again. That pause between emptying and filling is the natural respiratory pause. That’s when a perfect shot is taken.

But someone just popped out of that bush and you need to take the shot now. There isn’t time to wait for nature. Stop breathing, take the shot, continue breathing. Now, I didn’t say hold your breath. Having full lungs will make your body unstable and incapable of maintaining any sort of shooting platform for even a short time. Simply freeze your chest, nothing extra in, nothing extra out. Just stop breathing. Don’t wait too long to breathe again though. A lack of oxygen affects coordination and vision a great deal more than people realize, and faster too.

Breathe regularly and calmly. Having a strong cardiovascular system is the key to dominating the battlefield.

Putting it all together

In a seamless setting, it would look thus:

Threat perceived > weapon sights aligned with the eye / trigger slack taken up > breathing stopped / front sight focus > trigger breaks / trigger held > breathe / acquire target > allow trigger reset > breathing stopped / front sight focus > trigger breaks / held

That whole process shouldn’t take more than a second or two once you’ve established the muscle memory. Although, you needn’t rush it. Fire only as fast as you can hit. It’s ok if they shoot first, just as long as you hit first.

Note: Some weapon systems won’t allow for all aspects of this technique and you must adapt the technique and process as needed to keep it efficient. For example, an Steyr AUG uses an analog process to determine semi or full-auto firing. In the case of this weapon, you wouldn’t be able to hold the trigger to the rear because it would be firing instead of follow-through…ing…

Sources:

  • Rifle Marksmanship MCRP 3-01A

Combat Stance

•19Mar2008 • Leave a Comment

Imagine a boxer’s fighting stance, now add a weapon in his hands. That’s how you should look. Your body is square to the target and your head is not lowered to the sights. In this position, you have maximum mobility coupled with effective engagement on your target.

Consider this picture below. The shooter on the left is nearly perfect while the shooter on the right (me) needs to have the butt higher in the pocket of his shoulder so he doesn’t have to adjust his neck.

Room Entry

Feet

A common thing I see people doing incorrectly is opening up the toes on the stance. That is, when they drop their support leg back to fire, the toes end up pointing out from where the target is. It usually ends up making a right angle, give or take a few degrees. While this ultimately will have little effect on how well you can engage a target, it does have an effect on how you manage recoil and certainly on your mobility.

Having both feet point directly at the target is a fundamental of having your natural point of aim. Having a natural point of aim is very important for follow-on shots as well as a higher percentage of first round hits.

Keep your weight off your heels. That doesn’t mean stand on your toes, but center your weight slightly forward so that at least on your rear foot you can feel most of the weight transferring to the ball of your foot.

The hard and fast: The feet are about as far apart as your shoulders (shoulder-width), your strong side foot (coincides with handedness) is dropped slightly to the rear ( roughly about the toes online with the heel of the opposite foot), toes point at the target.

Legs and Hips

Think of your body system like it’s a tank. The shooting platform is the upper torso, the mobility platform is the lower half of your body. It also could be compared to how the Master Chief 3D model moves in the Halo games. This section is semi-redundant of the feet section.

Naturally, if your strong side foot needs to be slightly to the rear, so must the leg of the foot it’s attached to…if your feet and hips are lined up a certain way, your hips can’t be any other way.

In addition to all the feet pointers, your knees should be slightly bent, and never locked (that’s when you straighten your legs and they’re not supported by muscle, but bone on bone stability. You can feel it when you stand and your knees sort of…lock…into place). This gives a system of flexible support, like shocks in a vehicle. You are able to better stay on target when moving because the impact of movement is absorbed up by your knees. That keeps it from transferring all the way up your body to your sights.

It also helps absorb recoil, giving you faster follow on shots.

Back

The back, or more specifically the spine, is the vital component of the upper torso shooting platform concept. All other parts cannot be perfect if the back isn’t perfect.

Your spine needs to be straight as a rod. Not only is this fundamental to combat shooting, but it prevents injury to the muscles and spinal column. If your spine gets jacked up somehow, the nerves running inside it could jack up literally anything, from losing feeling in your toes, to never walking again, to not being able to have kids.

The potential problem people have with this portion of the technique is that you are supposed to lean slightly forward. This is done more in the hips than in the back. Your upper body weight is shifted slightly forward, toward the target, but your back stays straight. Often, people curl their back and bring their shoulders into it. This does help absorb recoil, but since it’s not a major pivoting joint in the machine, it screws up follow on shots because you no longer have a natural point of aim that your body falls back into.

Shoulders

Theoretically, your shoulders should be square to the target, and aligned with the hips, but that generally only works for range training your combat stance with targets.

Depending on how big you are, and the size of your weapon, you may have to modify your stance. Being a smaller individual, I am still capable of keeping squared shoulders with an M4 and shortened buttstock, but cannot with an M16 and especially not a full stock shotgun. The result is a combat stance that leaves my upper body slightly bladed to the target.

In a gunfight, you need to be maneuvering as well as shooting. With the “body like a tank” combat stance concept in mind, the shoulders may not always be aligned with your hips, but your natural point of aim will be more consistent if they are.

Elbows

Elbows are tucked in tight to the body. This may be difficult for the weaker individuals at first, but if you force yourself to do it, you will develop the muscles. Believe me, I was one of the weaker ones. Keeping your elbows in keeps them from getting shot off and allows for greater control of the rifle and recoil (*ahem* if your airsoft rifle has recoil). You are pulling back and down, instead of just back. In the long run, it actually fatigues you less. It takes more muscle and effort to hold your elbow up all day.

Keeping your elbows in maintains consistency in weight distribution. Knowing how your body moves will enable you to more effectively win the fight if you are more stable individual. Every martial arts style and system of combat has loads of theory on stability, center of gravity, keeping yours, and hampering the opponents. Having your elbows sticking out broadens the center of gravity and it’s more likely to affect your balance and stability if something were to contact your elbow. In essence, you are providing a lever with which something can turn your body.

Ultimately though, it keeps you from looking like a retarded Black Hawk Down Delta impersonator like the guy on RenegadeRecon‘s site…

Head

This will be the trickest, but most vital, muscle memory to reprogram for most people. Your head does not move toward the sights. The weapon must be held so that it lines up with the eye. Examine the picture of me above, a properly positioned buttstock would put the bottom point of it in my shoulder pocket about where the brown strap of the sling is.

The actual axis of recoil is above the shoulder line. This fact alone causes many people to assume a lower shoulder weld and disregard this technique. While the recoil would be harder to manage for someone not properly employing every aspect of this stance, there is some trade-off happening. The line of recoil being above the shoulder causes significantly more muzzle climb than having it transfer directly into your shoulder. However, if you lean into the target, shift your weight to the balls of your feet, stay square to the target, and keep your elbows in and pulling down, you will be able to recover from the recoil just as fast, and still be on target.

Regardless of how tight you keep the rifle in your shoulder pocket, the point of the buttstock hitting that concentrated region will cause quite a bit of pain. The upside is, the old adage “the more you hurt in training, the less you hurt in war” holds true. Eventually, the nerves in that region will deaden and cease to cause pain, and then your technique will be flawless.

Eyes

Keep both eyes open at all times. At the ranges airsoft (and MOUT environments) tend to play out at, you need maximum peripheral vision. When you first start practicing this, and I still need to do this, you may need to slightly squint your support side eye. That will cause your eye in the sights to procure a more dominant place in the way your brain sees the image.

For some individuals, they were taught to be right handed, when really, they are left-eye dominant, as I was. So now I do nearly everything right handed, but the picture my brain sees is more often dictated by my left eye’s focus. To compensate, when I pick up my sights in my eye, I squint my left eye until my right eye clearly sees through the sights, then fully open both.

References:

  • Infantry Rifleman Course>Student Handout Booklet (USMC)
  • USMC Weapons Drill Guide
  • Military Operations on Urbanized Terrain MCWP 3-35.3

Ambush – Overview

•15Mar2008 • Leave a Comment

The oldest “trick in the book” is hitting your opponent when he’s not ready for it. The concept of an ambush is what nearly all facets of violent action revolve around. What better way to fight than when you’re ready, and they aren’t?

In general, ambushes serve one purpose: reduce the effectiveness of your adversary. If you can conduct many successful ambushes, the enemy begins to realize that it can happen at any moment, and then must constantly remain vigilant. This heightened awareness causes significant mental fatigue, which is often worse for him than other, more physical problems. If you continue to harass the enemy in this manner, they will become demoralized and problems will brew among their teamwork. Affecting the opposition psychologically is many times more effective, overall, than simply eliminating individuals.

Knowing that an ambush is likely makes a persons aggressive mindset adjust to a more defensive one. Troops in a hesitant and worried frame of mind are prone to confusion and/or panic when the fecal matter strikes the oscillating device. When you become overly cautious, you are more likely to hesitate. Two seconds of hesitation in a gunfight is 2.5 seconds too long of a reaction time.

Consider this aspect of demoralization: At a 6-on-6 pickup game, one team is constantly winning match after match. The losing team, regardless of why they actually are losing, will have many excuses and gripes about mis-match, disadvantages, poor tactics choices of their leaders, and more. This bickering attitude works in favor of the winning team. It breeds the classic scenario that plays whenever a team loses a few times, and then begins to lose in a wholesale fashion.

Classification of Ambushes

A deliberate ambush is a preplanned attack with specifics. An example of this would be an attack on a known fortified position (a fort, bunker, etc.), a specific location (crossroads, bridge, etc.) where enemy frequently travel, or anything, given prior knowledge of the enemy in some way.

A ambush of opportunity is fairly self-explanatory. It is happening upon something you can attack, with a decent level of surprise for the enemy. This is most likely to occur in scenarios where you are walking along, “patrolling”, and happen upon someone/people who are unaware of you. Combat grunts refer to a type of this as “trolling for contact”*, similar to how you would drive your boat around with a lure in the water, fishing.

Types of Ambushes

A point ambush is the most common for a small unit. This type concentrates all of your firepower on a specific target. This can be a fort, or a patrol, or a bunker, or anything really. Lining up along a road and lighting up a foot patrol is a common example.

An area ambush can generally only be safely conducted by forces larger than squad size. This ambush is conducted by hitting multiple targets simultaneously as part of one ambush. For example, 1st Squad attacks an observation/listening post (LP/OP) while 2nd Squad attacks the enemy leaders tent and both start their attack when an enemy foot patrol is attacked by 3rd Squad on the trail.

To summarize:

  • Purpose of an Ambush – destruction and harassment in order to reduce enemy effectiveness
  • Deliberate Ambush – preplanned with any kind of specific information about the enemy
  • Ambush of Opportunity – chancing upon the enemy and being able to set up and shoot first
  • Point Ambush – attacking one target
  • Area Ambush- point ambushes done at the same time in a general region

*The general downside to “trolling for contact” implies you are walking around, waiting for someone to shoot at you first. Not recommended in combat unless you are a highly trained, squad-sized, group of Marines, who have been bored for the last 5 months and find the risk of death acceptable if it means SOMETHING will happen.

References:

  • Infantry Rifleman Course>Student Handout Booklet (USMC)
  • Scouting and Patrolling MCWP 3-11.3
  • Marine Rifle Squad FMFM 6-5

Safety Guidelines

•13Mar2008 • Leave a Comment

Here are the four weapons rules that, if you adhere to them without fail, will prevent any unintended discharge of the weapon.

  1. Treat EVERY weapon as if it were loaded.
  2. Never point a weapon at ANYTHING you do not intend to shoot.
  3. Keep the weapon on safe until you INTEND to fire.
  4. Keep your finger straight and off the trigger until you ATTEMPT to fire.

In general, you should also be aware of your target, and what lies beyond. This is good practice in cases of over penetration, or if someone, who’s not as amazing a shot as yourself, might miss and strike that poor infant behind the target.

In regards to eye protection, it should always be worn. Eyes are delicate AND expensive to repair. However, even if you are struck in the eye, I doubt it would kill anyone.

Airsoft guns fire their BB’s at a variety of speeds. Depending on the gun, BB, distance, and where it strikes, you may not feel it, or it may slightly break the skin. Dealing with the pain is part of the game.

Don’t be afraid to interrupt a game or scenario if you witness something unsafe, such as a bystander walking by, or a player has removed their goggles. “Better safe than sorry” is the defacto rule. If you are unsure, consider the defacto rule, and then make the call.

These guns are replicas. By definition, they look like real guns. When you are playing a game, no matter how remote, it’s wise to call the police before hand to inform them of what you are doing. This is not just in case the police see you, but in case someone else calls the police to tell them “some kids have guns and look like they are going to shoot something up”. Now the police know you they don’t have to call the SWAT team on you.

If the police DO show up at your game, call it out and stop playing immediately. For safety’s sake, put all weapons on the ground, and disarm as much as possible so the police can feel at ease. You don’t want someone with a real gun feeling all jumpy. No one would blame them if they shot you, given the circumstances. Don’t give them a reason. Don’t argue. Do anything they tell you to immediately, no matter how ridiculous or inane.

If you appear to be committing a crime, and have an airsoft gun, you ARE committing a crime. They must be transported just as a real firearm would, so stow them in containers. If you conceal and carry an airsoft gun, it is as illegal as if you were carrying a real one.

Phonetic Alphabet

•2Mar2008 • Leave a Comment

I have seen many different standardizations of the phonetic alphabet in my travels. What’s important to remember is not what word to use, but rather, keep it easily identifiable. Having a standard one among your allies is preferable, because you know what words you are looking for.

That being said, the concept of the phonetic alphabet communication is to relay letters and numbers without confusion. Many numbers and letters can sound similar in pronunciation to each other. When saying the “phonetic letter” you are saying an entire word, but the listener is identifying that word with it’s first letter. Therefore, if I was going to read license plate number XET395 over the radio, I would actually say, “X-ray echo tango tree niner fife.”

What I have presented as standard, below, is what is used by the United States Marine Corps. I have put in parenthesis the sounds you should try to make in order to be as clear as possible on the radio.

A: Alpha (al-fa)

B: Bravo (bra-voh)

C: Charlie (char-lee)

D: Delta (dell-tah)

E: Echo (eh-coh)

F: Fox (fhocks)

G: Golf (gaulf)

H: Hotel (hoe-tell)

I: India (in-de-uh)

J: Juliet (jew-lee-it)

K: Kilo (key-low)

L: Lima (lee-mah)

M: Mike (myk)

N: November (know-vhem-burr)

O: Oscar (hoss-curr)

P: Papa (pah-pah)

Q: Quebec (kweh-beck)

R: Romeo (row-me-oh)

S: Sierra (see-air-uh)

T: Tango (tayn-goh)

U: Uniform (you-nee-form)

V: Victor (vick-tore)

W: Whiskey (whiss-key)

X: X-ray (ex-ray)

Y: Yankee (yayn-key)

Z: Zulu (zoo-loo)

1: One (wun)

2: Two (too)

3: Three (tree)

4: Four (fow-er)

5: Five (fife)

6: Six (sicks)

7: Seven (sev-un)

8: Eight (ate)

9: Nine (nye-ner)

0: Zero (zee-row)

Weapon Conditions

•2Mar2008 • Leave a Comment

These are the standardized weapon conditions I have adapted to airsoft. These refer to the different states of readiness and safety applicable to any airsoft weapon.

Condition 1: Source of ammunition, power available, BB in position, safety engaged.

Condition 2: Source of ammunition, power available, BB not in position, safety engaged.

Condition 3: No source of ammunition, power available, safety engaged.

Condition 4: No source of ammunition, no power available, safety engaged.

Now, it’s important to remember that not all of these conditions apply to every weapon. Some of the the condition descriptions may even refer to different states in different weapons. Each weapon style will have a different list of condition states, but ALL will adhere to these guidelines.

For example, a Cybergun Smith and Wesson Sigma (CO2, full metal, full trades) will only have all conditions pertain to it. Condition 1 would have the magazine loaded up, CO2 canister punctured, and the magazine inserted. Since there is no safety switch, that part is ignored. Condition 2 would have the slide racked, which cocks the weapon and cycles a BB into the chamber. Condition 3 is awkward, but plausible. The magazine would not have any BB’s in it, but the CO2 would be punctured and the magazine inserted. Condition 4 has the magazine removed.

Another example is the Tokyo Marui Steyr AUG. This weapon is different because of it’s cycle of operations. All four conditions apply to this rifle. The other conditions are obvious, you simply detach the battery for source of power removal (as you removed the CO2 from the Sigma above). The only difference is now condition 2 applies. This rifle needs to be dry fired (but it’s not really “dry”, just no BB comes out) in order cycle a BB into firing postion.

Since these conditions are not an industry standard, and I doubt we’ll convince China to start putting them in their manuals (if you get an English one), you’ll need to ponder how your particular weapons works, and then figure out which conditions apply.

Weapon Carries

•1Mar2008 • Leave a Comment

These carries apply to all weapons. They are not intended to show how to carry a specific type of weapon. The best way to think about what these carries are is that they are ways to hold weapons in different states of engagement readiness.There are three basic carries: tactical, alert, and ready.

The tactical carry is utilized when the possibility of enemy contact is remote. This is the least physically tiring of all carries. A rifle is gripped with both hands, one forward (on the foregrip/forearm/etc.) and the other (firing hand) in firing position (on the pistol grip or stock, finger off the trigger). The stock is tucked under the arm and rides at your side, near your hip. The muzzle points up and remains between your eyes and what you’re looking at. A pistol in this attitude of readiness is carried in the holster, and is called a “holster carry”.

Note: CQB type weapons without butt stocks (which make this carry awkward) shouldn’t ever be carried outside a CQB environment and in a CQB environment, you should use the ready carry always, but never less than the alert under any circumstances.

The alert carry is utilized when there is a good chance you’ll encounter some enemy. This is more tiring physically than the tactical carry, but allows for a quicker reaction time to engage. A rifle is carried with the butt in the shoulder, ready to fire. The muzzle is angled downward, about half lowered, to provide a better range to scan for sign of the enemy. A pistol is carried in the same way, held out in front of the body with both hands.

Note: A pistol tucked into the body, with arms bent and muzzle downrange, could still be considered in this type of carry.

The ready carry is utilized when you are going to contact the enemy, and soon. This is the most physically tiring of all the positions, and also causes the most mental fatigue, due to your heightened state. With all weapons, you are in your shooting stance from the waist up. It would be better to say that your eyes are not in the sights, rather than say the weapon is “slightly lowered”. Your eyes are just searching for something to sight in on and engage.

It would be prudent of me to point out that in a typical airsoft skirmish, you wouldn’t ever use a carry less than the alert. The only time I could see using the tactical carry is if you were in a large scale game spanning a great area and time frame. You be the judge, you’re the one getting kills/killed.

These three carries have also been known by: alert, low alert, and high alert (respectively, down the list).

Training Tip: When you transition between carries, try to do it smooth, seamless, and efficiently. Mostly, there isn’t any reason to be taking your hands off the weapons or adjusting them to new places. You should be adjusting your arms only.

Aiming

•29Feb2008 • 1 Comment

A gun is sorta like a camera, point and shoot. However, there are things that have to be done to get a picture to turn out.

There are a few methods to aiming. Sighted, point, and snap.

Snap shooting is when you are firing on instinct alone. This is the least accurate, but can be improved with perfect training of sighted aiming. The concept that improves this ability is “muscle memory”. When you are experienced in delivering aimed fire, your instinctually aimed fire will improve. But this isn’t the movies. Generally ineffective past 3 yards or so.

Point shooting is when you hold your finger along the side of the weapon and point it toward your target. This is mostly done with shotgun or weapons with a spreading group of projectiles. This technique can be useful for getting off quicker shots and in low light situations that make acquiring the sights difficult.

Sighted shooting is when you take the time to line up the sights on the weapon with your eye and the target. You’ll want to use your dominant eye, which generally coincides with your handedness.

The process of aiming should use these three aiming techniques as steps in the aiming process. As you present your weapon to engage, you should adjust your body so it’s natural point of aim will more efficiently snap aim. Once your body is positioned correctly, you should consider your hands (and finger if it is along side of the weapon, it SHOULD be along side the trigger guard according to the 4 weapon safety rules) and move them to align your weapon with the target. When your hands move the weapon to be in a position of alignment with your eye, you begin getting proper sight alignment, and sight picture.

Training Tip:

Focus your mind on each individual step when training. Take it very slow to start. Slow is smooth, and smooth is fast. You want to build muscle memory of the process so that when you need to do it fast, you will do it perfect naturally. Only perfect practice makes perfect.